
Deployments
Below projects in the Oasis deployment hierarchy are deployments. A deployment contains an ArangoDB, configured as you choose. You can have any number of deployments under one project.
Organizations → Projects → Deployments
Each deployment can also be backed up manually or automatically by schedules you can define.
In essence, you can create whatever structure fits you for a given organization, its projects and deployments.
Also see the video Create a Deployment on ArangoDB Oasis.
How to create a new deploymentPermalink
- If you do not have a project yet, create a project first.
- In the main navigation, in the Projects section, click the project for which you want to create a new deployment.
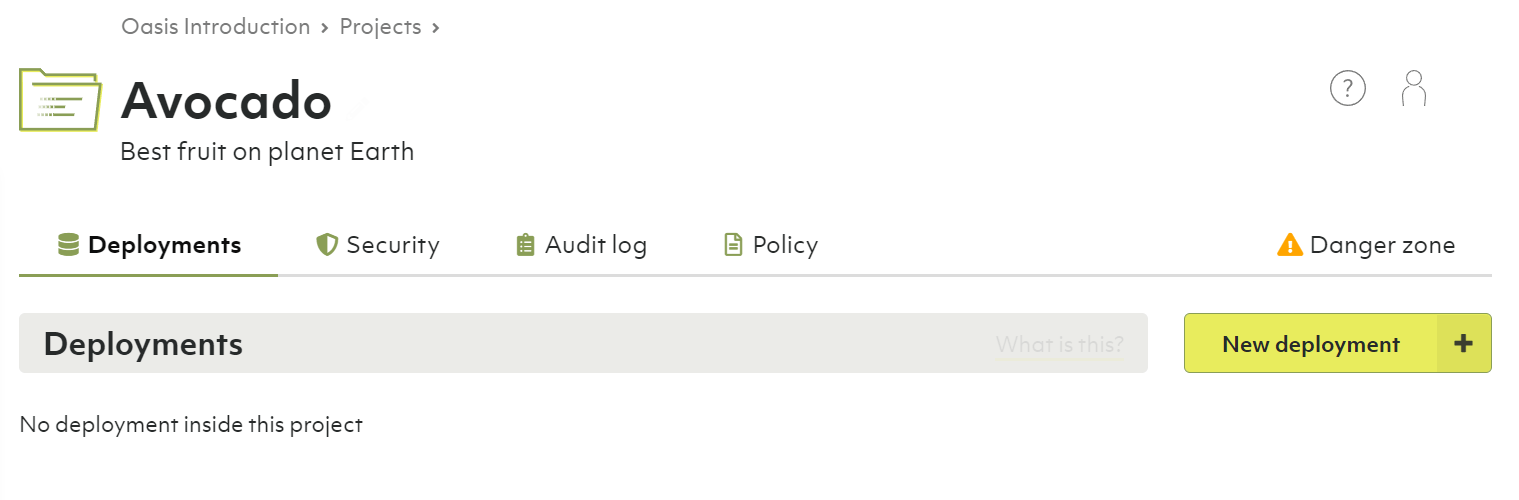
- In the Deployments tab, you will see an empty list or a list with your project’s existing deployments.
- Click the New deployment button.
- Set up your deployment. The configuration options are described below.
Also see the video Create a Deployment on ArangoDB Oasis.
Deployments contain exactly one policy. Within that policy, you can define role bindings to regulate access control on a deployment level.
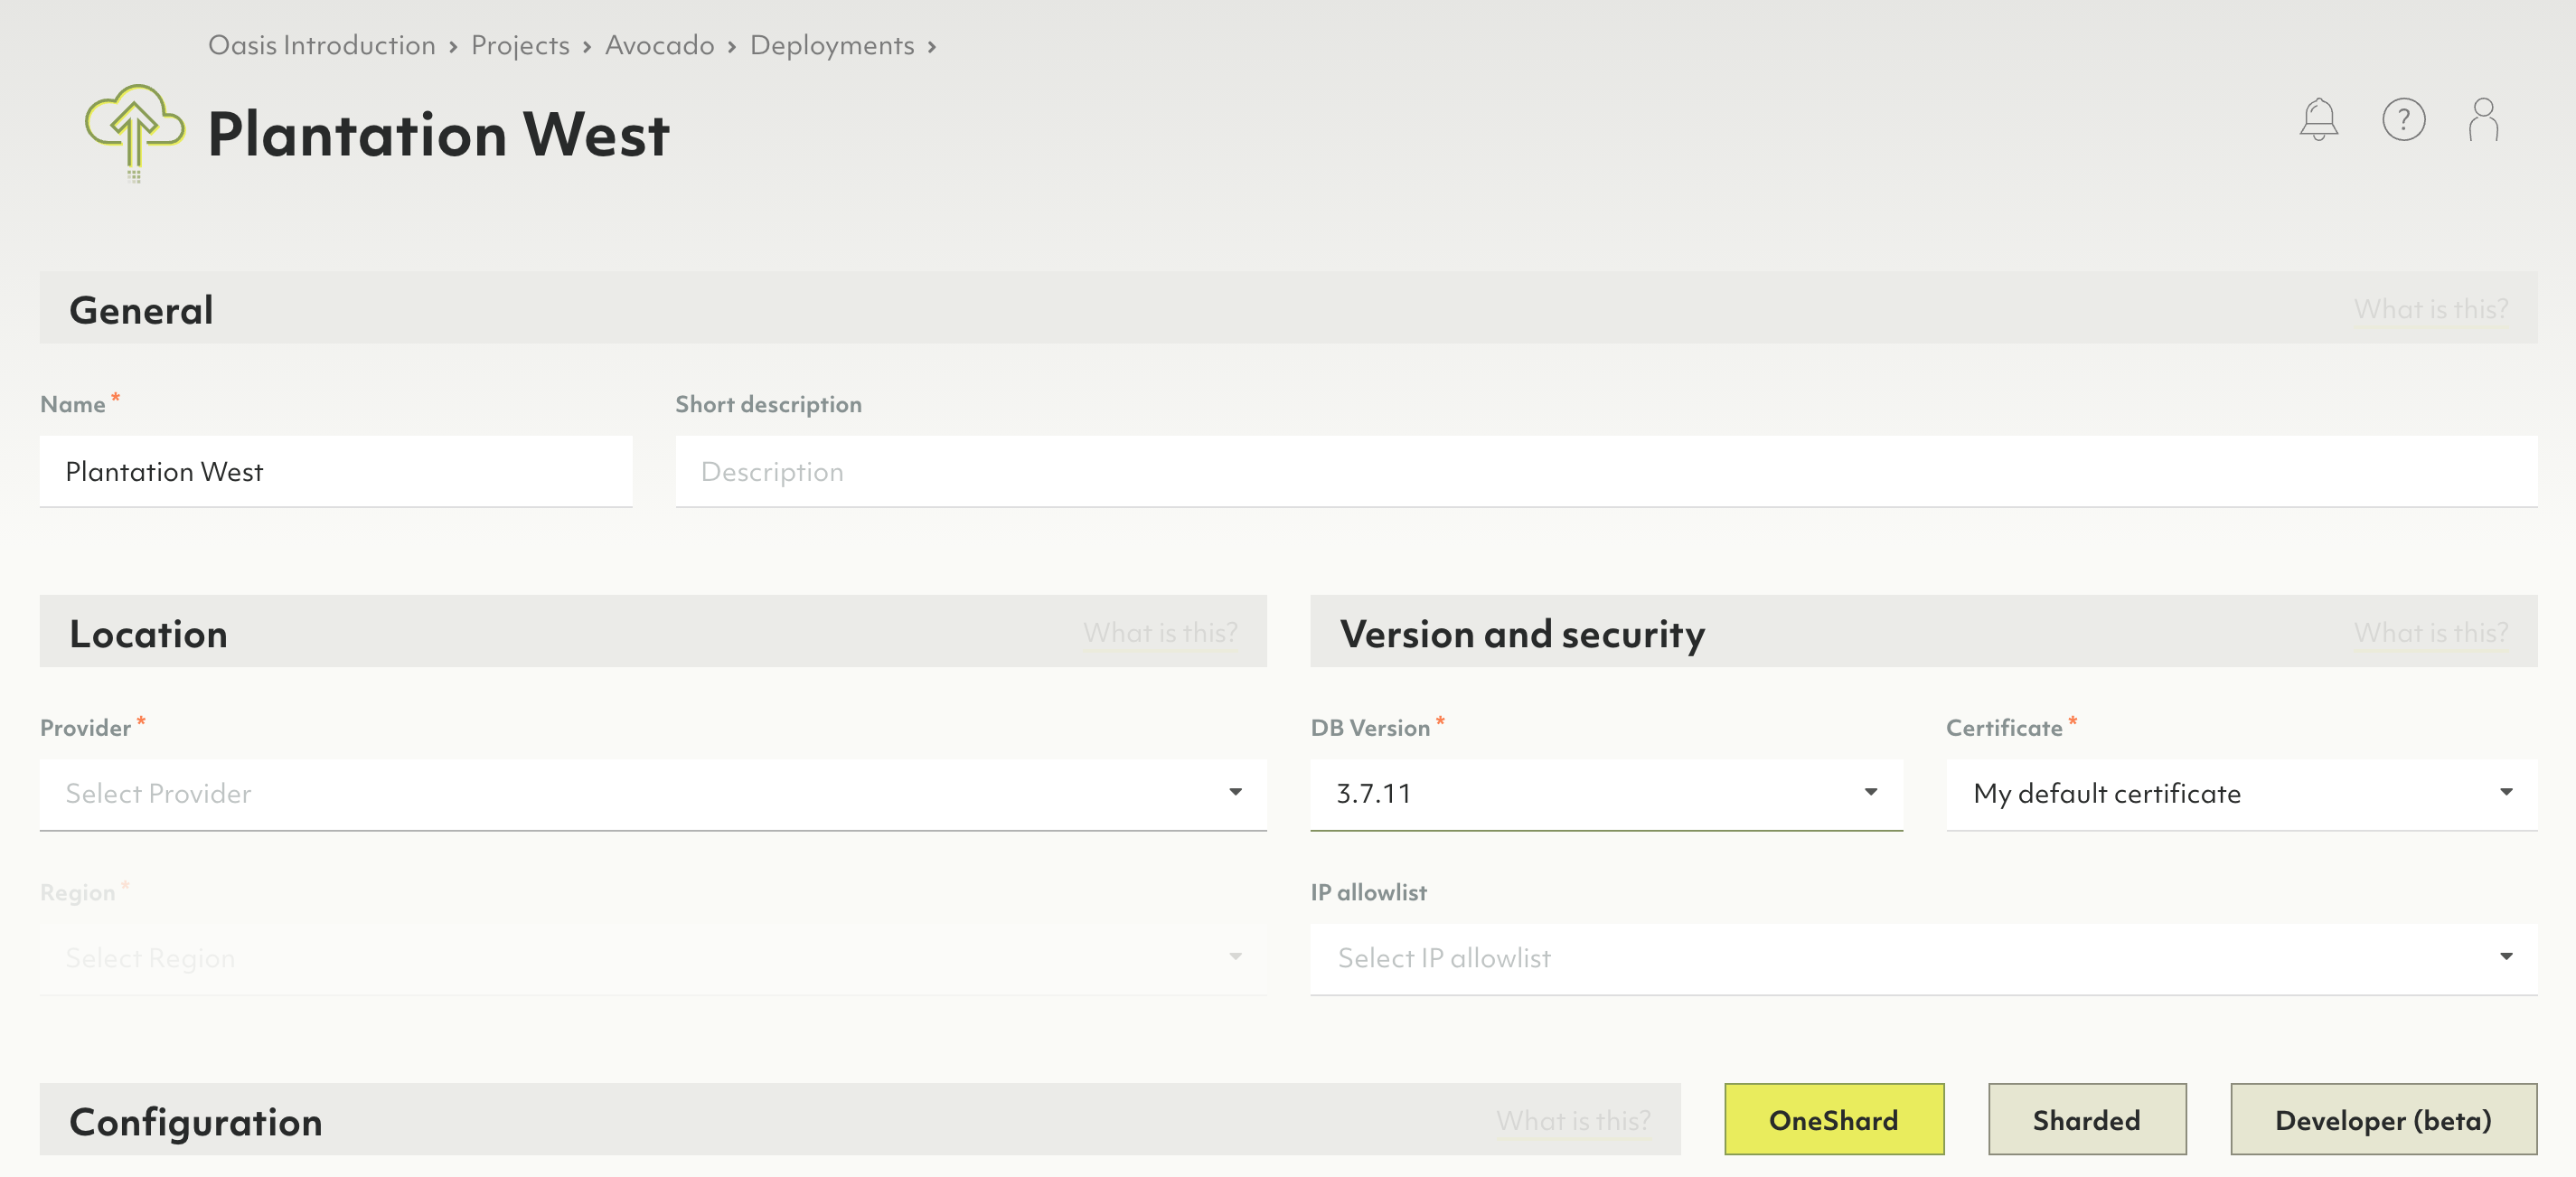
In the General sectionPermalink
- Enter the name and optionally a short description for the deployment.
In the Location sectionPermalink
- Select the Provider and Region of the provider.
- Select the DB Version. Note: If you don’t know which DB version to select, leave the version selected by default.
- In the CA Certificate field
- The default certificate created for your project will automatically be selected.
- If you have no default certificate, or want to use a new certificate create a new certificate by typing the desired name for it and hitting enter or clicking the name when done.
- Or, if you already have multiple certificates, select the desired one.
- Optional but strongly recommended: In the IP allowlist field, select the desired one in case you want to limit access to your deployment to certain IP ranges. To create a allowlist, navigate to your project and select the IP allowlists tab (also see the video IP allowlists with ArangoDB Oasis).
For any kind of production deployment we strongly advise to use an IP allowlist.
In the Configuration sectionPermalink
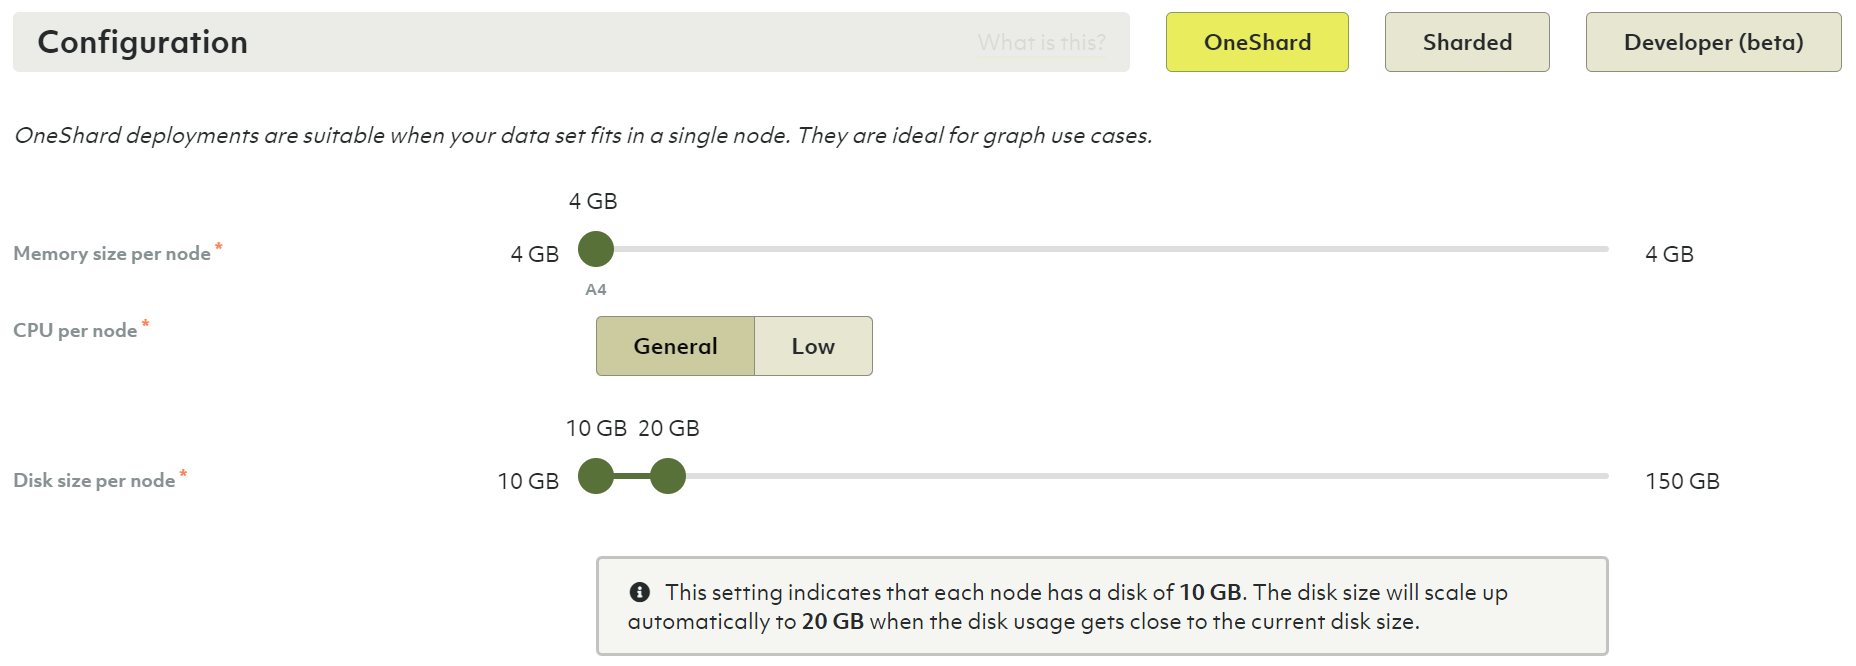
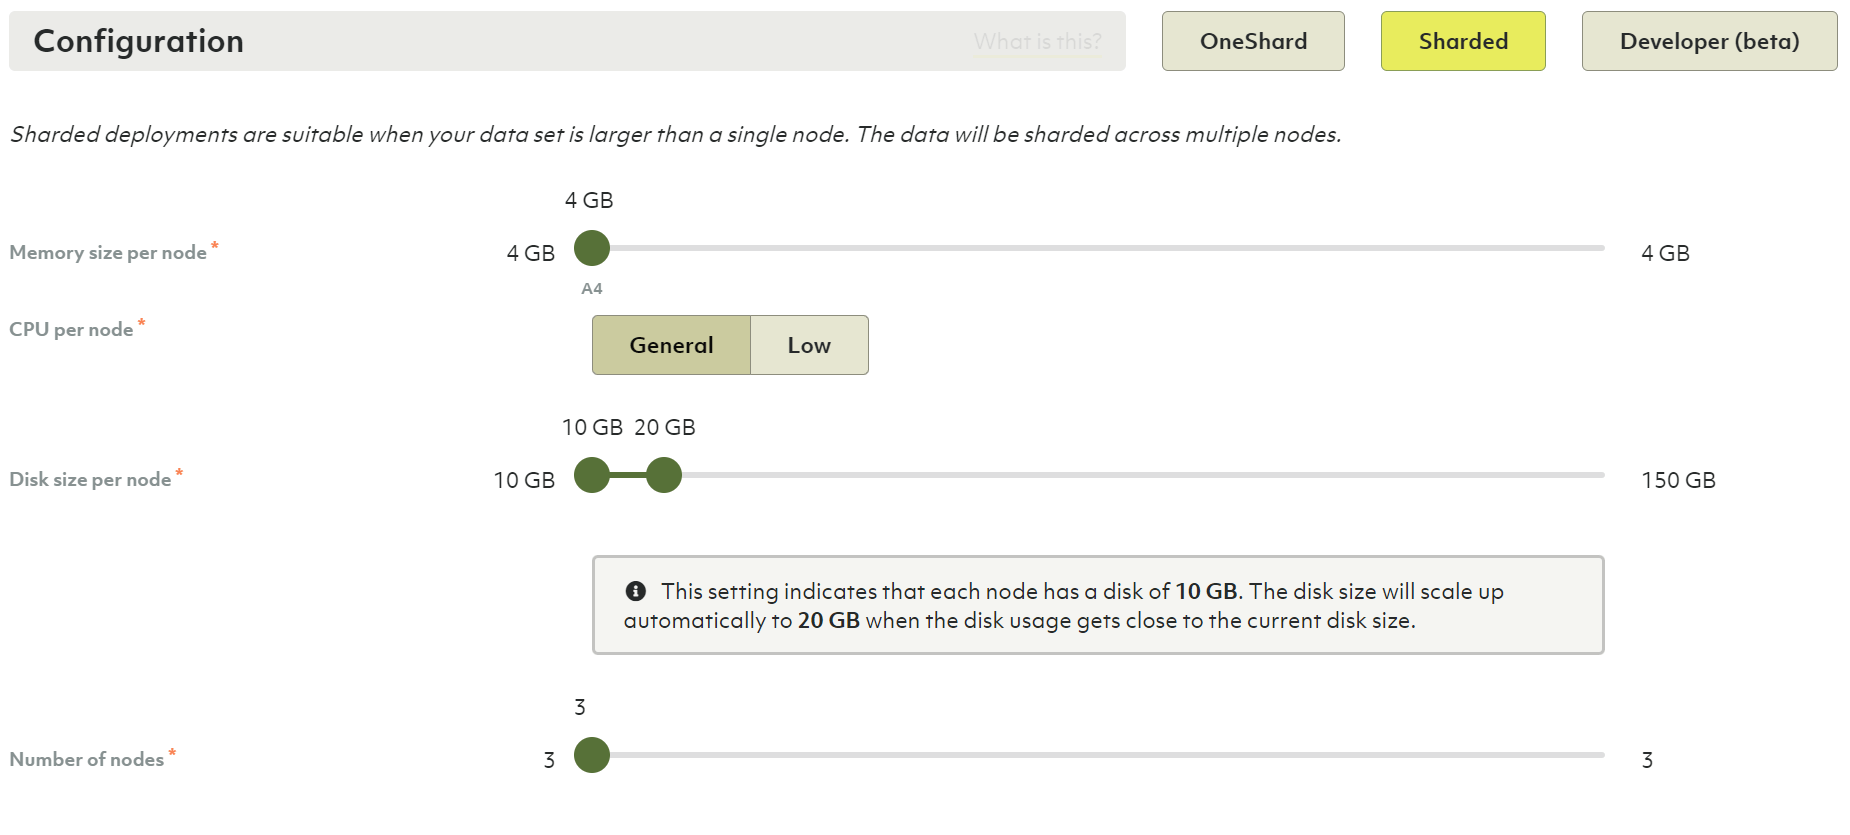
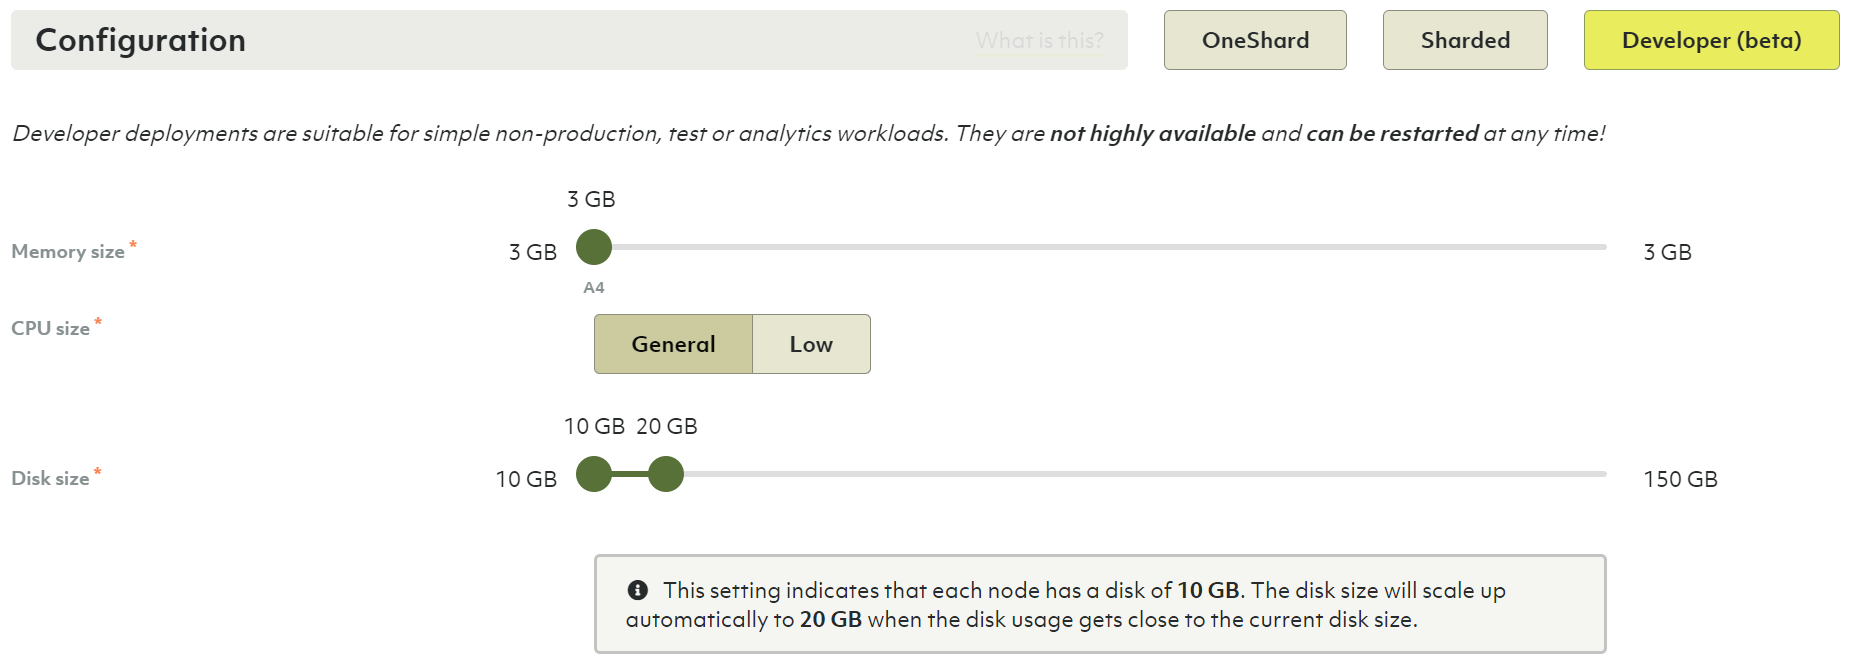
Choose between a OneShard, Sharded or Developer deployment.
-
OneShard deployments are suitable when your data set fits in a single node. They are ideal for graph use cases.
-
Sharded deployments are suitable when your data set is larger than a single node. The data will be sharded across multiple nodes.
-
Developer deployments are suitable when you want to try out ArangoDB without the need for high availability or scalability. The deployment will contain a single server only. Your data will not be replicated and your deployment can be restarted at any time.
OneShardPermalink
- Select the memory size of your node.
- Select the CPU size of your node.
- Select the initial disk size of your node. The available ranges for the disk size depend on the selected memory size.
- Select the upper limit for the disk size. It defaults to twice the initial disk size. You can set it to the same value as the initial disk size to disable automatic disk sizing.
A deployment’s node disk size is automatically increased by 25% when the maximal disk usage of a node exceeds 75% of its capacity, up to the configured limit. You will be notified via email when the disk size is increased, as well as when your deployment runs out of disk space but cannot be resized because it reached the upper disk size limit already.
ShardedPermalink
- In addition to memory and disk size as in the OneShard configuration, select the number of nodes for your deployment. The more nodes you have, the higher the replication factor can be.
DeveloperPermalink
- Like with OneShard and Sharded deployments, you choose memory and disk size. However note that the sizes you choose are for the entire deployment. For OneShard and Sharded deployments the chosen sizes are per node.
In the Summary sectionPermalink
- Review the configuration, and if you’re ok with the setup press the Create button.
- You will be taken to the deployment overview page. Note: Your deployment is at that point being bootstrapped, this process will take a few minutes. Once it is ready, you will receive a confirmation email.
How to access your deploymentPermalink
- In the main navigation, in the Projects section, click the project for which you created a deployment earlier.
- Navigate to the Deployments tab.
- For each deployment in your project, you see the status. While your new deployment is being set up, it will display the bootstrapping status.
- Press the View button to show the deployment page.
- When a deployment displays a status of OK, you can access it.
-
Click the copy icon next to the root password. This will copy the deployment root password to your clipboard. You can also click the view icon to unmask the root password to see it.
Do not use the root username/password for everyday operations. It is recommended to use them only to create other user accounts with appropriate permissions.
- You will also receive an email that the deployment is available, with a URL to open it up.
- Click the Open endpoint button or on the endpoint URL property to open the dashboard of your new ArangoDB deployment.
- In the username field type
root, and in the password field paste the password that you copied earlier. - Press the Login button.
- Press the Select DB: _system button
At this point your ArangoDB deployment is available for you to use — Have fun!
Each deployment is accessible on two ports:
- Port 8529 is the standard port recommended for use by web-browsers.
- Port 18529 is the alternate port that is recommended for use by automated services.
The difference between these ports is the certificate used. If you enable Use well known certificate, the certificates used on port 8529 is well known and automatically accepted by most web browsers. The certificate used on port 18529 is a self-signed certificate. For securing automated services, the use of a self-signed certificate is recommended.
How to enable the root user password rotationPermalink
Password rotation refers to changing passwords regularly - a security best practice
to reduce the vulnerability to password-based attacks and exploits by limiting
for how long passwords are valid. ArangoDB Oasis can automatically change the
root user password of an ArangoDB deployment periodically to improve security.
- Navigate to the Deployment for which you want to enable an automatic password rotation for the root user.
- On the Overview tab, click the button with the gear icon next to the ROOT PASSWORD.
-
In the Password Settings dialog, turn the password rotation on and click the Confirm button.
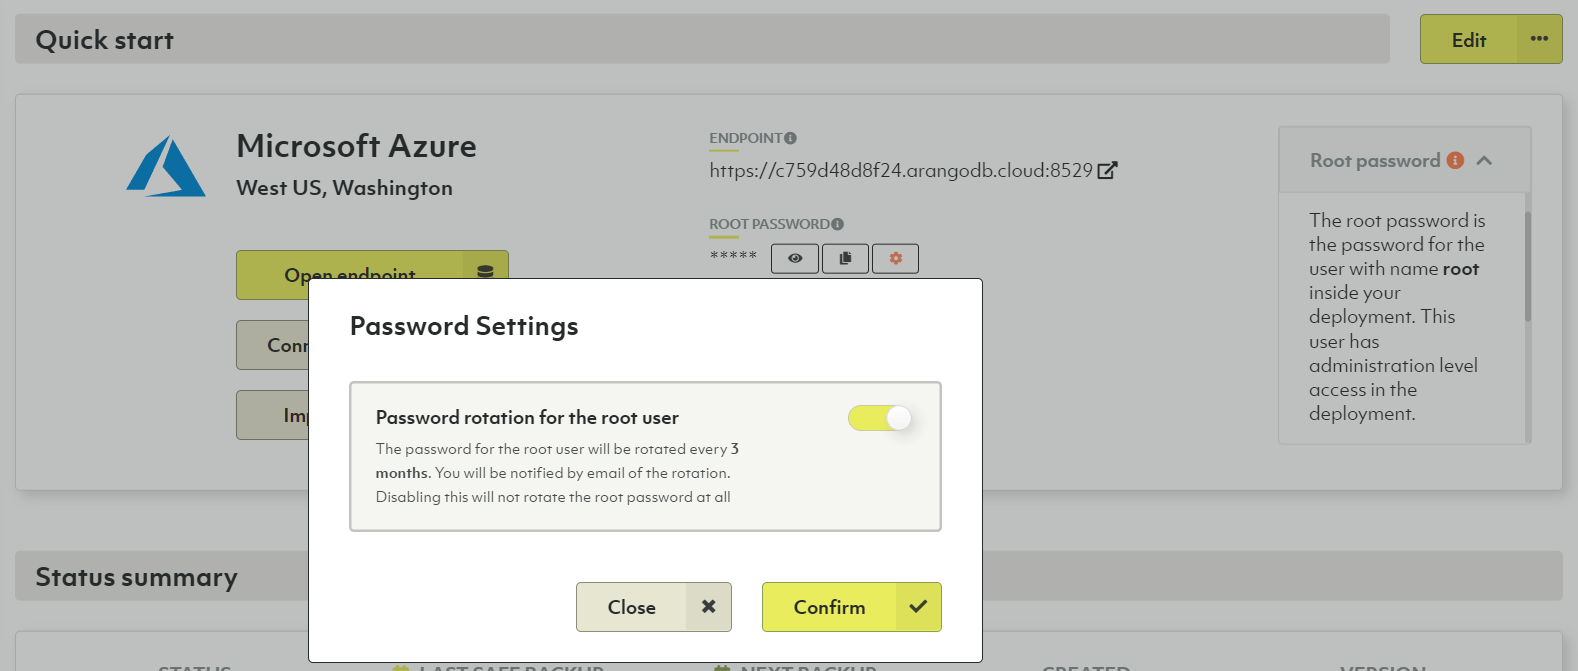
- You can expand the Root password panel to see when the password was rotated last. The rotation takes place every three months.
How to create a private endpoint deploymentPermalink
Microsoft Azure offers a feature called Azure Private Link that allows you to limit communication between different Azure servers and services to Microsoft’s backbone network without exposure to the internet. It can lower network latency and increase security.
If you want to connect an ArangoDB Oasis deployment running on Azure with other services you run on Azure using such a tunnel, then create a regular deployment and change it to a private endpoint deployment afterwards.
The deployment will not be reachable from the internet anymore, other than via the Oasis dashboard to administrate it. To revert to a public deployment, please contact support via Request help in the help menu.
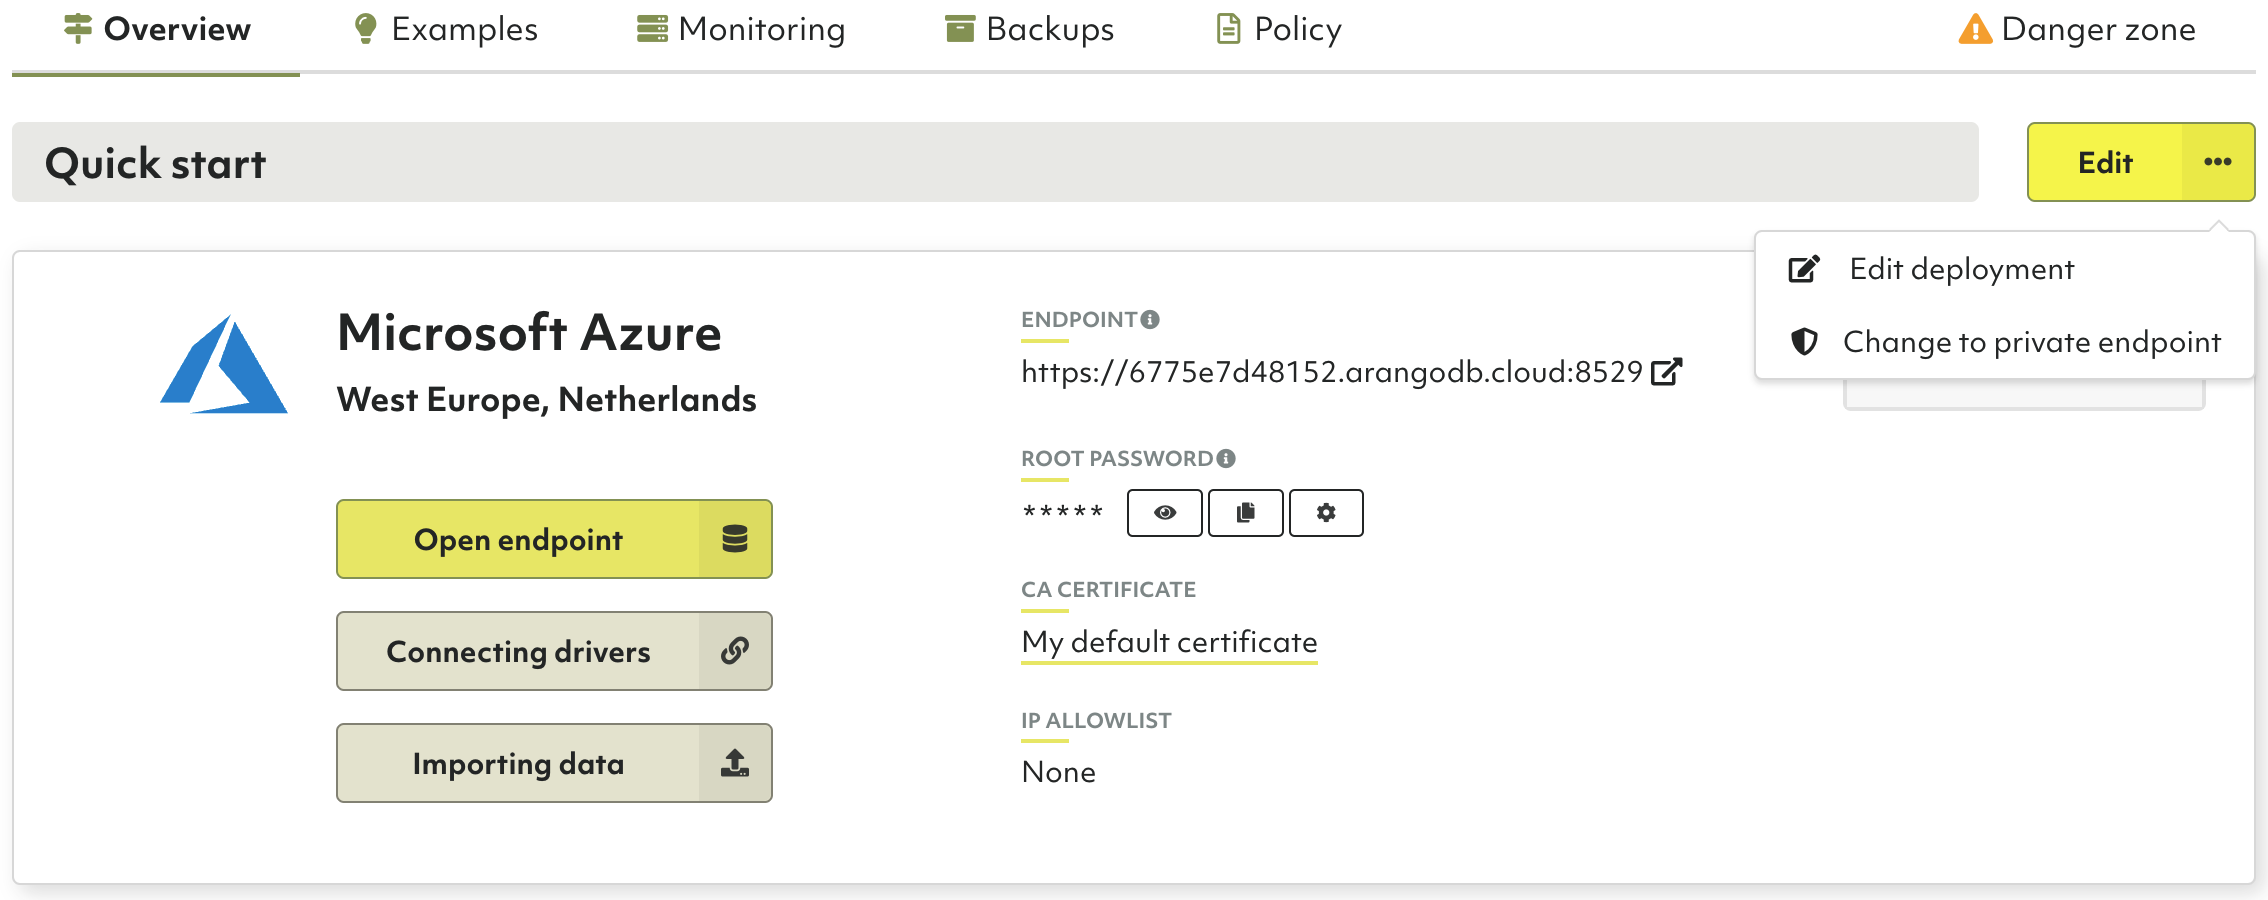
- Open the deployment you want to change.
-
On the Overview tab, click the Edit button with an ellipsis (
…) icon. If you see a pencil icon and no menu opens, then you are either on the free-to-try or professional tier, or the selected deployment is not eligible.The private endpoint option is only available on the enterprise tier for deployments running on Azure.
- Click Change to private endpoint in the menu.
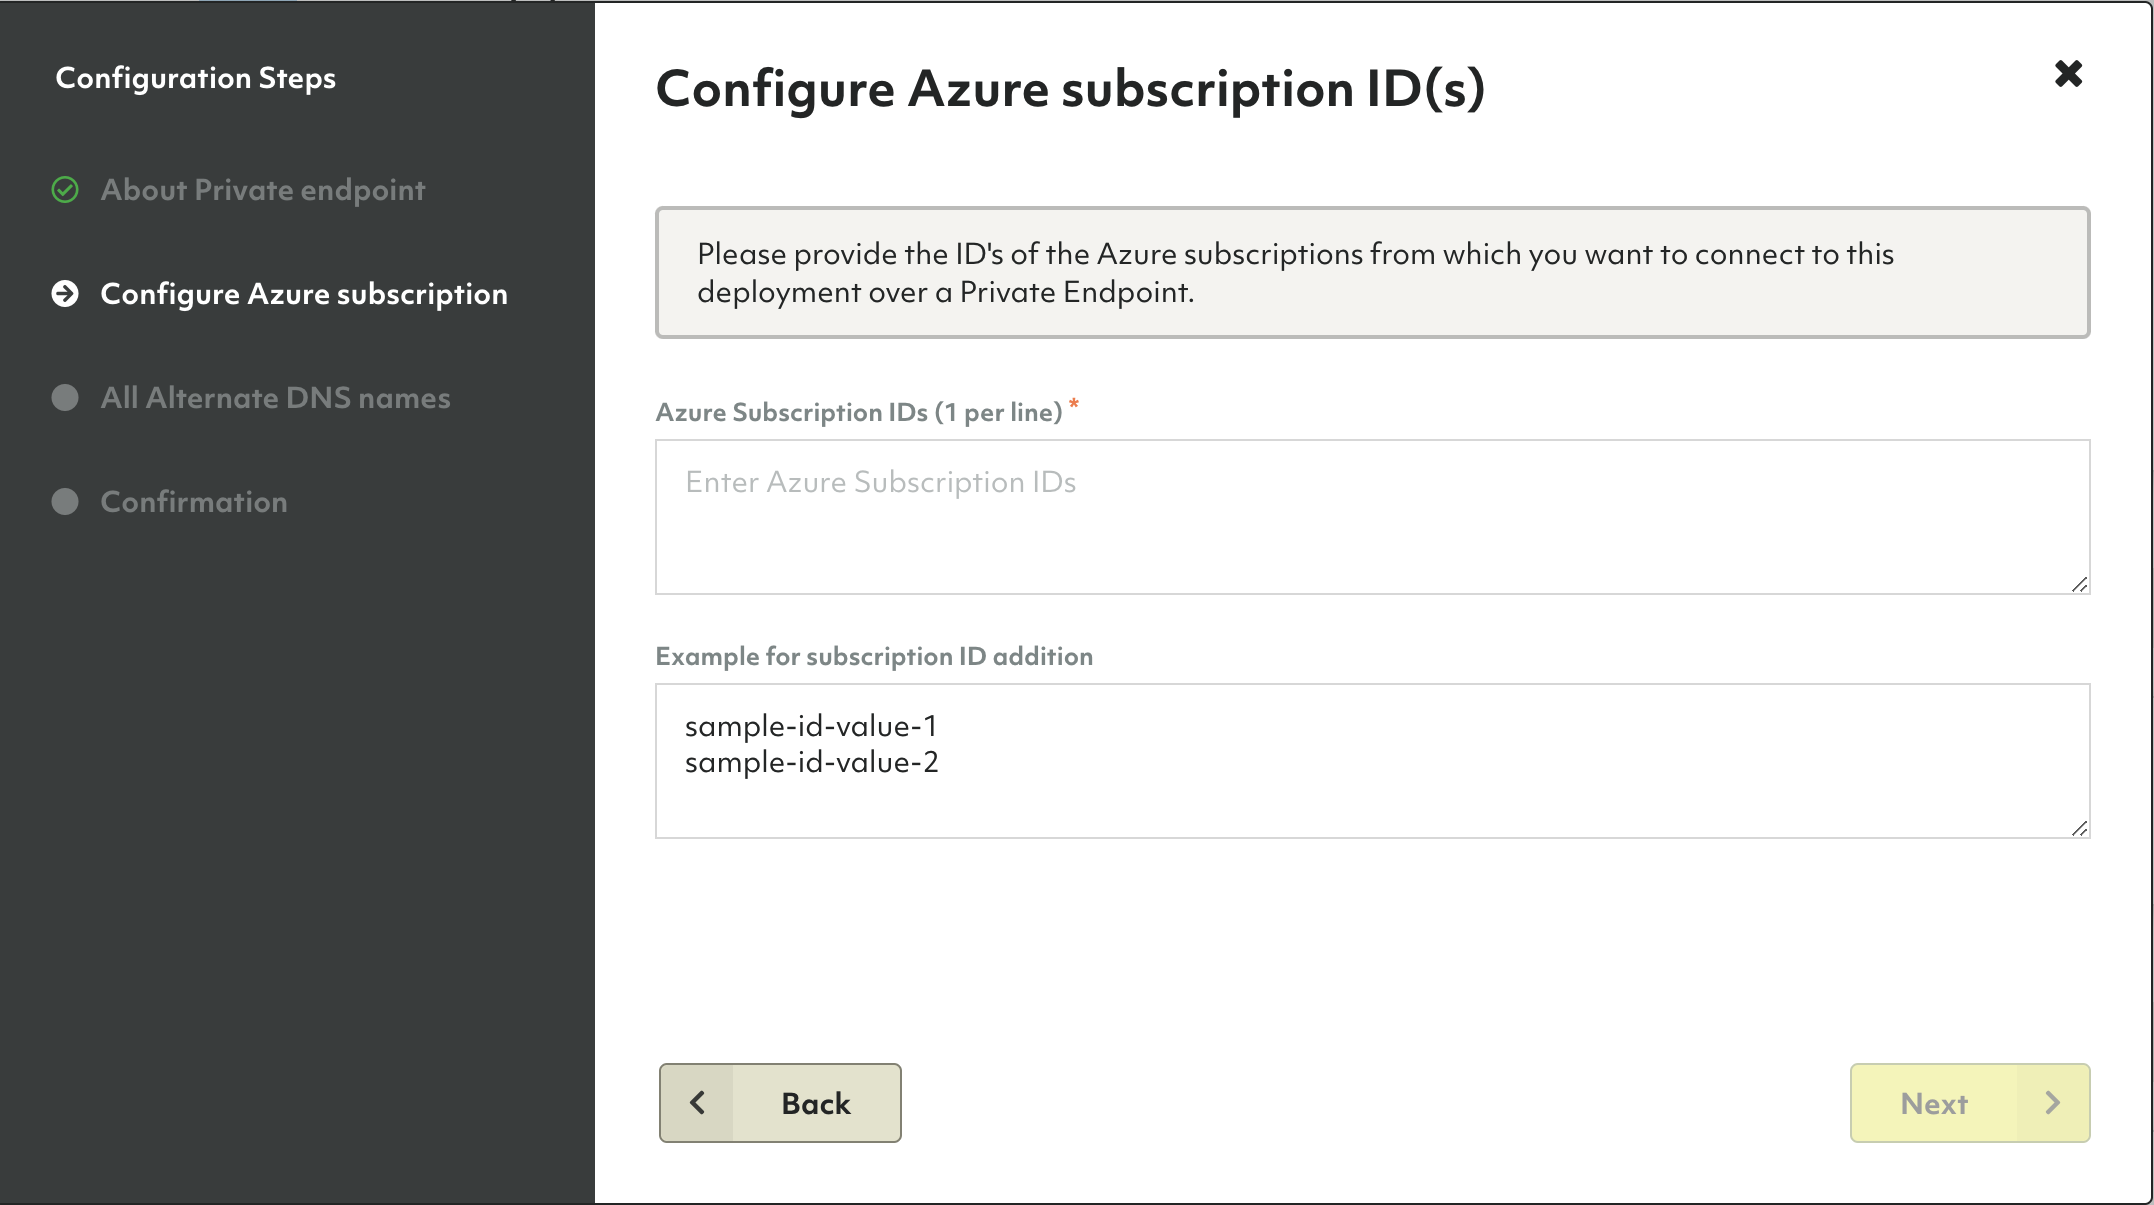
- In the configuration wizard, click Next to enter your configuration details.
- You need to enter one or more Azure Subscription IDs (GUIDs). They cannot be
changed anymore once a connection has been established.
Proceed by clicking Next.
- You may enter one or more Alternate DNS names. This step is optional. Continue with or without Alternate DNS names entered by clicking Next. They can be changed later.
- Click Confirm Settings to change the deployment.
- Back on the Overview tab, scroll down to the Private Endpoint section that is now displayed to see the connection status and to change the configuration.
- Oasis will configure a Private Endpoint Service. As soon as the Azure alias becomes available, you can copy it and then go to your Microsoft Azure portal to create Private Endpoints using this alias. The number of established Connections will increase and you can view the connection details by clicking it.
How to delete a deploymentPermalink
Deleting a deployment will delete all its data and backups. This operation is irreversible. Please proceed with caution.
- In the main navigation, in the Projects section, click the project that holds the deployment you wish to delete.
- On the Deployments tab, click the deployment you wish to delete.
- Click the Danger zone tab.
- Click the Delete deployment button.
- In the modal dialog, confirm the deletion by entering
Delete!into the designated text field. - Confirm the deletion by pressing the Yes button.
- You will be taken back to the deployments page of the project. The deployment being deleted will display the Deleting status until it has been successfully removed.